Subscribe to Our Weekly Newsletter
ISS is the most comprehensive source for self-storage news, feature stories, videos and more.
Finding a plot of land on which to build self-storage is a significant achievement, but it’s only the first step toward your end goal. As you lay pencil to paper to design the site, follow these guidelines, which will help you arrive at a strong layout and unit mix.

Here’s a common scenario for anyone looking to build a new self-storage facility: You have a land parcel, but it isn’t zoned for self-storage; so, you’ve submitted a request for a zoning change or special-use permit that’ll allow self-storage as a use. You have a boundary survey in hand, so now you’re itching to start laying out the site and determine maximum rentable square feet. Well, not so fast! There are critical to take before putting pencil to paper, or you could wind up with an unrealistic idea of the site’s potential.
There are many, many variables that affect the development of a self-storage property. In this article, I’ll focus on general guidelines for creating an effective site layout and unit mix, regardless of the type of project you’re designing (single-story, multi-story, drive-up, climate-controlled). No matter what kind facility you’re planning or where it’s located, these rules of thumb should help.
To truly understand how your self-storage project can be configured on the parcel, you’re going to need a site survey. Make sure it includes not only property boundaries but any roadways, utilities, drainage or other easements on or adjacent to the site. Your survey should account for any existing structures on the property or within 20 feet. It should also show the 100-year flood plain (possibly the 500-year flood plain) if it’s on or adjacent to the site.
A topographical survey is also necessary—even if you think your site is flat—because water will flow in a particular direction, and that information is important to site design. Also, check the jurisdiction’s requirements for tree preservation and mitigation to determine if you need a tree survey. Bundling all of these products together can save you money if the surveyor can do them all at once.
Finally, if you’re commissioning a consultant to conduct a feasibility study and market analysis, have that report prepared concurrently with the above surveys to save time. This’ll allow you to start your design sooner.
While you wait for the surveys, it’s a good time to fully research the legal parameters of the site, as they’ll limit how much self-storage you can build and precisely where on the property. Investigate the zoning ordinances as well as the building and fire codes, including all amendments. These can typically be found on the jurisdiction website or by contacting local building or planning officials. They can be used to determine:
Required setbacks from property lines
Right-of-ways
Off-street parking requirements
Maximum building heights
Maximum floor-area ratios
Maximum lot coverage (most important)
Many jurisdictions also require minimum areas of non-paved surfaces that include green space and landscape buffers.
One thing to note is that although the minimum setbacks listed in the zoning ordinance may allow you to build close to the property line, the building code will require special fire-rated wall construction if you’re within a certain distance. To determine if the additional cost of the firewall is worthwhile, balance it against the additional net rentable square footage (NRSF) created.
Building codes and fire codes will also determine allowable building heights, number of floors and square footage. Be aware that these may conflict with the local zoning ordinance! If there’s a conflict, the more restrictive requirement always wins.
When determining which building codes to follow, always check for any amendments. It’s a common practice for jurisdictions to adopt a particular building and fire code but then amend certain portions at will. For example, there’s often an alteration that reduces the allowable square footage for structures that aren’t protected by a fire-suppression system.
Your self-storage feasibility study and market analysis should determine the total current demand in your specific market in NRSF. It may also estimate future demand. Based on this information, the study will provide the optimal mix of unit sizes and types to build, including how much of the facility should be drive-up or climate-controlled.
The total square footage and percentage of drive-up to climate-controlled units are the biggest drivers behind self-storage site design. If the parcel accommodates more buildable square footage than the feasibility study recommends, it may make sense to plan the project in phases. This can allow you to accommodate estimated future demand while minimizing your long-term risks.
Of course, following the analysis recommendations is sometimes impossible due to various site constraints. In urban areas where large tracts are hard to find or land costs are high, you may decide to develop a multi-story building, which severely limits the number of drive-up units you can include. Steep terrain can also alter the unit mix. There’s a limit to how much foundation stepping can be accommodated before the expense outweighs the benefit, and moving huge amounts of dirt can become too costly.
Ultimately, the decision may be to go vertical and reduce the footprint or gross square footage to work around topographical constraints. Either of these moves will modify the self-storage unit mix. And the wrong mix can mean a longer lease-up period.
Once all that homework is done, the fun can begin! Use the information gleaned from the self-storage land surveys, zoning research and feasibility report to determine the highest possible NRSF and best unit mix. I like to start with the site survey, using the other surveys and zoning ordinances as reference, and add all the setbacks and landscape buffers to the drawing. Next, I sketch arrows showing the direction of stormwater flow. Now we’re ready to design. The following will help maximize site efficiency:
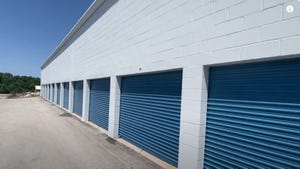
Traditional drive-up buildings. I recommend putting single-sided, inward-facing structures around the perimeter of the site where they can double as security fencing, reducing your security costs. It you can put drive-up units on both sides of an aisle, you’ll reduce paving costs, too. Many jurisdictions even require perimeter buildings to screen the drive aisles and roll-up doors from the street or neighboring properties. When screening isn’t required, you can increase NRSF by paving all the way to the property line.
As much as possible, orient the long sides of your buildings so they run in the direction of the stormwater arrows (ground slope) to minimize significant cut/fill grading and for ease of water runoff. The exception is any area with cold winters. Here, the buildings should run east and west to minimize any north/south facing walls and mitigate snow and ice buildup. Drive-up units and building entrances along north exposures should also be avoided when possible.
Climate-controlled buildings. These are typically placed with fire lanes on all sides, which allows them to be larger than allowances without the fire lanes. If a building is multi-story, put it near the site entrance to maximize visibility. As to building entrances, place them so that no self-storage unit is more than 150 feet from any entry point (measured along hallways).
Drive aisles. Sites with one entry/exit point should be designed with a looped drive. When dead-end drive aisles are impossible to avoid, be careful of their length. At a certain point, you’ll want to provide a turnaround area for customers, or it may be required by the fire marshal if the aisle also serves as a fire lane.
The recommendation for main drive aisles and those containing a fire lane is 30 feet wide, while secondary drive aisles can be reduced to 24 feet. If you need more NRSF, you can consider reducing the secondary aisles to 20 feet, but keep in mind that this makes two-way traffic more difficult.
If boat/RV storage will be offered, you’ll need wide drive aisles for those areas, too. Spaces perpendicular to the drive aisle should be 15 feet wider than the unit depth. For efficiency, put boat/RV units across from each other.
Loading areas. Consider installing awnings or canopies or build them covered to protect customers and their goods against the elements. In colder climates, fully enclosed loading areas with overhead doors are beneficial.
With any rules of thumb, there can be exceptions. Every self-storage site will have its own unique challenges, so use these guidelines as a starting point and adjust as needed. You may have to consider other criteria, so engage an architect or civil engineer who’s familiar with industry design—and do so early in the process.
Once you settle on a rough self-storage layout, request a pre-development meeting with the jurisdiction to present your design for feedback. Many not only encourage these meetings, they require them. It gives all the reviewers who’ll sign off on your project an early look, so they can highlight any potential issues and provide guidance to the approval process.
David Baca is an architect and principal of Baca, a Sherman, Texas-based design firm. Over the past 15 years, he’s designed self-storage facilities ranging from rural, traditional, drive-up to more complex and architecturally sophisticated multi-story properties in urban settings. For more information, call 903.893.5800.
You May Also Like